Here you can access General settings for the LinkedIn accounts and manage the automated tasks related to connecting and engaging with your network from the side menu.
You can also see the connection status of the account and which Engine the account uses for automation.
Lastly, you can see which plan the account is currently and by clicking the “change plan” link you can access the billing hub to upgrade or downgrade the current plan.

General Settings
If you want to stop an account from performing any automation you can use the enable/disable account toggle.
You will notice when an account is disabled the top bar of the page will change to orange and a warning icon will appear in the account switcher to remind you that the account is not active and no tasks will be performed.

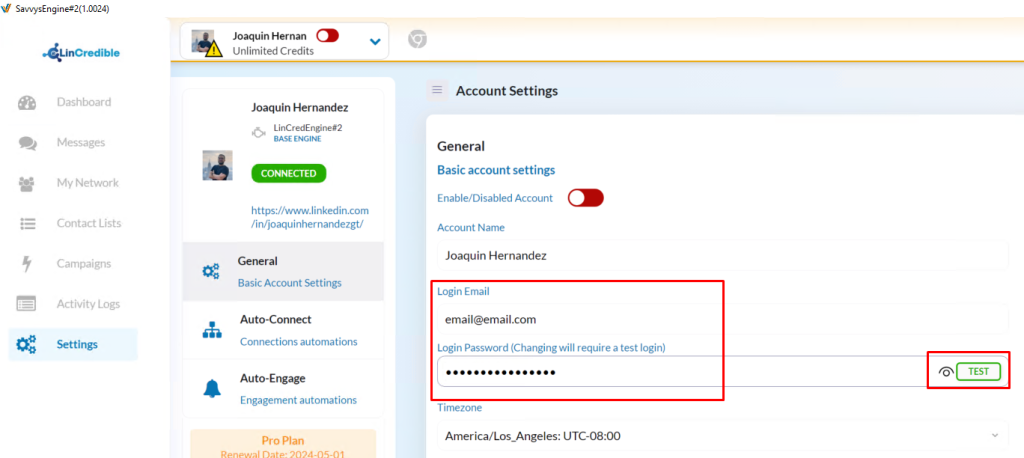
Here you can also edit other account settings such as the account Name and the email address associated with the LinkedIn Account.
When you access these account settings from the Engine that the account uses to carry out automated tasks you can also update the password. If you alter the password the system will need to run a visual test log in, similar to when you added the account, to make sure everything still works correctly.
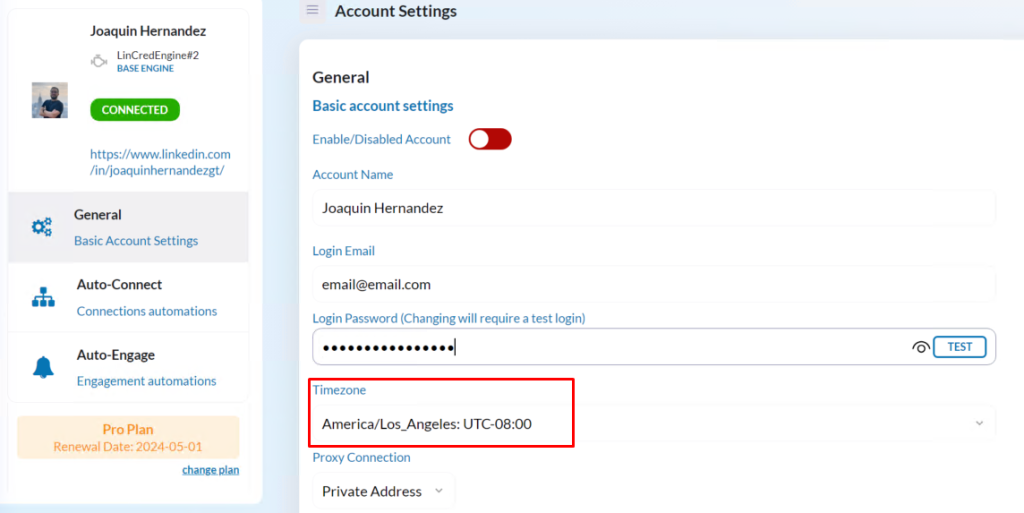
You can also update the account timezone settings. Please note that any changes to the timezone will be reflected after the next time any automated tasks run and will not affect any run times that have already been scheduled.
How the account connects to LinkedIn can also be updated. If you have a paid plan, you can use the Premium Connection here and can switch to a different country if required.
If you are using a Private connection, you can set the various fields required for that to work with your 3rd party proxy provider.
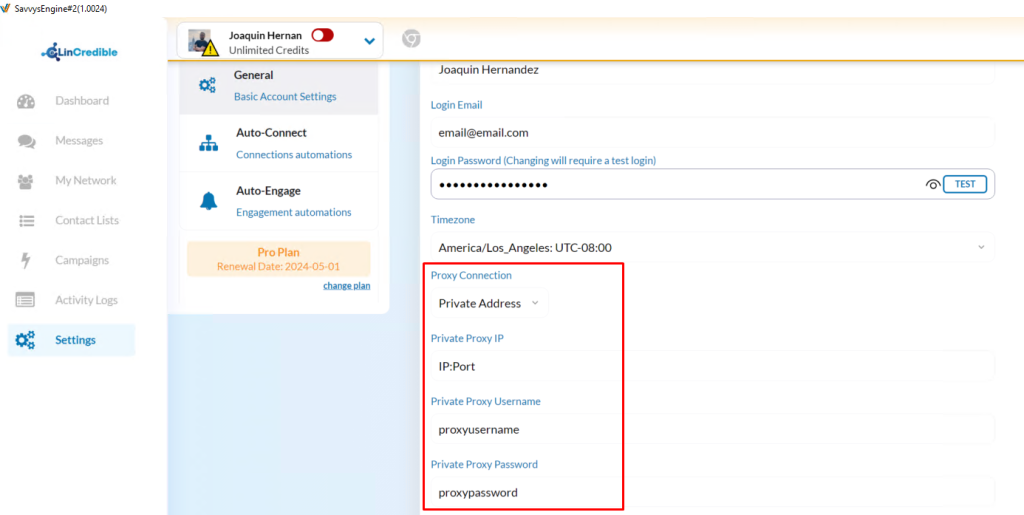
Here’s a video reference on how to check your country connection from LinkedSavvy and how to input your private IP details on your settings: https://drive.google.com/file/d/1hQ1kCCKy_pvebZpure5Ecp4bHCGhWTOE/view?usp=sharing
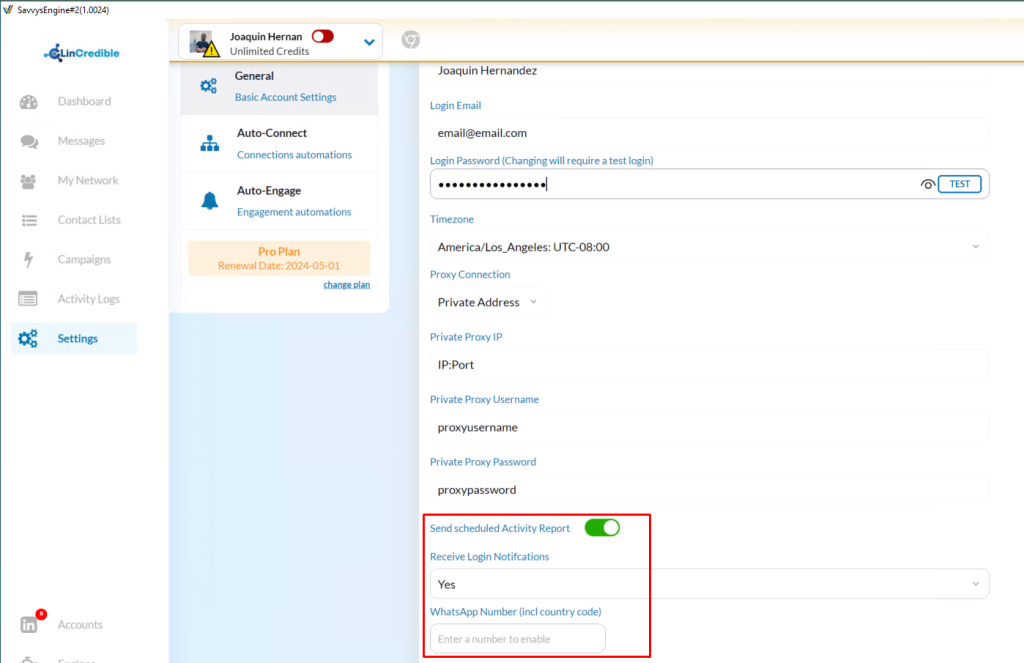
Lastly, Enterprise users can edit whether the account should receive notifications directly to the LinkedIn email if there are login issues and optionally whether to send a WhatsApp notification and what number to send to.
If using the WhatsApp capability you need to use a full mobile phone number including the country code, for example +44 for the UK followed by the rest of the number.
Auto-Connect
The Auto-Connect section allows to you configure all the automation relating to growing and managing your LinkedIn network.
Available automation includes:
- Accept Invitations to connect
- Withdraw invites
- Connect From Profile View
- Invite to company page (sends 50 invites per run, runs once weekly)
You can update the individual task settings by hovering over a task and clicking on the pencil edit icon to open the settings relating to that particular task.
Accept Invitation to Connect
This feature makes it easy for you to keep up with inbound invitations from others who wish to connect with you.
Every day the system will scan any inbound invitations and click accept to add them to your network.
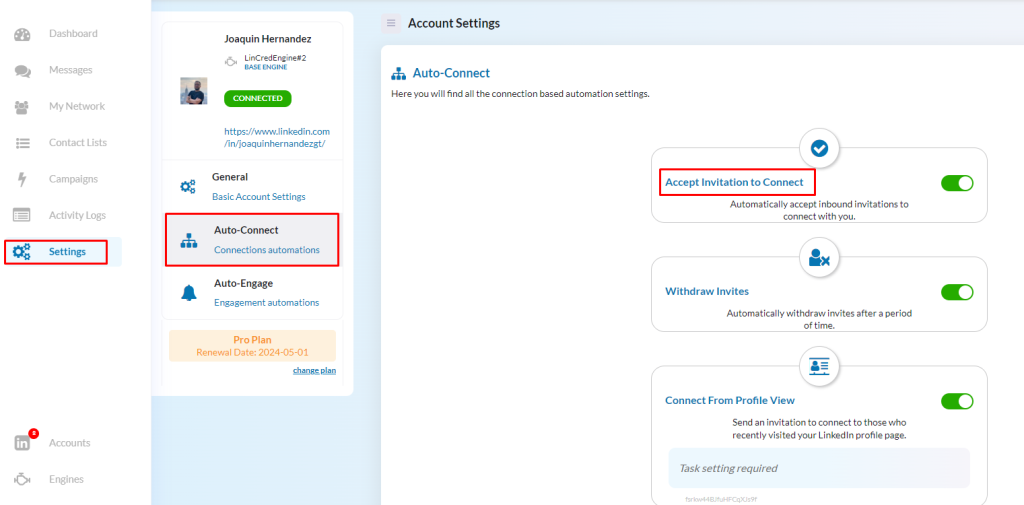
By default, the task will accept all invites sent to your account.
If you wish to constrain this to prevent unwanted connections from being created you can add one or more keywords in the task settings.

When a keyword is added here the system will only connect with profiles in which the keyword can be found within the profile text of the person sending you the invite.
For example if you only want to automatically connect with CEO’s you can add the keyword CEO and going forward only invites from CEO’s will be accepted and all other invites will be skipped.
Although non-matched invites will not be accepted they will not be removed either so you will need to manually check for any additional invites you may wish to accept.
Withdraw Invites
This feature automatically withdraws invites that have been sent from your account to others.
It is the only Auto-Connect feature to be enabled by default. This is because it is important to make sure that invites are not allowed to pile up on an account as LinkedIn will see this as a potential red flag for abuse.

In the task settings, you can control how long the system should wait before withdrawing an invite. The options are 1 week, 2-4 weeks and 1 Month and over.
The default setting is 1 Month and over. If an invite has not been accepted within a month it’s highly unlikely it ever will be.

LinkedIn prevents you from sending an invite more frequently than once every 6 weeks to someone. You should bear this in mind when building Lead Lists to use in your campaigns and try to avoid sending invites too often which will affect the performance of your outreach.
In addition to invites to connect with people that have been sent you can optionally remove invites that have been sent relating to your company page, and to any LinkedIn events you may have been promoting.

Connect From Profile View
When enabled this automation will check each for people that have visited your LinkedIn profile and send an invitation to connect to them.
This is a great way to build your network and we see very high connection rates from this approach.
In the task settings, you can limit who will be sent an invite using keywords. If no keyword is set the system will invite everyone who has visited your profile in the last few days.

When one or more keywords are set the system will only invite people whose profile includes any of the keywords provided.
For example, if you only want to automatically connect to any software developers you can add the keyword “software developer” and all other profile viewers will be excluded.
You can also add a message to be included as a note with the invite. You are able to personalise the message using all standard personalisation tokens but you must ensure the message is no longer than 300 characters (or less if you do not have a paid LinkedIn subscription).
The scheduling for this task is fully configurable and access to additional task settings is available too.

Invite to Company Page
When enabled this automation will check your company page and invite your connections. LinkedIn allows you to send up to 250 invites of this type monthly, and credits are renewed on the 1st of each month.
LinkedSavvy will send 50 invites once a week in order not to spend the whole 250 invites in one sit.
This is a great way to drive people into following your company page. Put your admin URL for the company page and save the changes, make sure to enable the task when done.

Auto-Engage
Auto-Engage is a powerful feature within LinkedSavvy designed to help you automatically respond to various notifications from LinkedIn, keeping you actively engaged with your network. This feature targets specific events related to your connections, such as work anniversaries, endorsements, birthdays, and when someone starts a new role. Here’s how to use Auto-Engage effectively:
Navigate to the Auto-Engage Section: Once you’re in Auto-Engage, you’ll see a list of features aimed at automating your reactions to different LinkedIn notifications.

Default Welcome DM: It sends an introductory note to anyone new on your network who wasn’t necessarily connected from an automated LinkedSavvy campaign.

Work Anniversary Message: Configure Auto-Engage to send a personalized message congratulating your connection on their work anniversary. This gesture helps maintain and strengthen your professional relationships.

Thanks for Endorsement Message: When someone endorses a skill on your profile, Auto-Engage can automatically thank them. This not only shows appreciation but also encourages a continued relationship.

Happy Birthday Message: Send birthday wishes to your connections. This personal touch can make your network feel valued and remembered.

New Job Message: Congratulate connections on their new positions. Acknowledging their achievements fosters goodwill and keeps you relevant within your network.

Leverage Auto-Engage for Lead Generation
Many users find that simply responding to these events, through personalized messages, can significantly enhance their lead generation efforts. By acknowledging your connections’ milestones, you create opportunities for meaningful interactions, which can naturally progress into deeper conversations and potential business opportunities.
Customize Your Messages: While Auto-Engage automates the process, personalization is key. Tailor your messages for each type of notification to ensure they resonate with the recipient, making them more likely to engage in further conversation.
By setting up Auto-Engage in LinkedSavvy, you not only streamline the process of staying in touch with your network but also open doors to new leads and opportunities, all with minimal effort. This feature exemplifies the power of maintaining active and thoughtful communication within your professional circle.
