Introduction to Campaigns in LinkedSavvy
Accessing Campaigns:
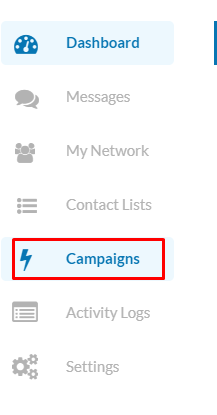
To begin, let’s explore how to access the campaigns feature within LinkedSavvy. Look for the campaigns icon, represented by a little lightning bolt, located on the left-hand sidebar of your dashboard.
Clicking this icon reveals the campaigns screen. If you’re initiating your journey with LinkedSavvy, this area might appear empty at first glance. However, as soon as you add a campaign, this screen becomes the heart of your activity, displaying a wealth of information.
Understanding Your Campaign Dashboard:
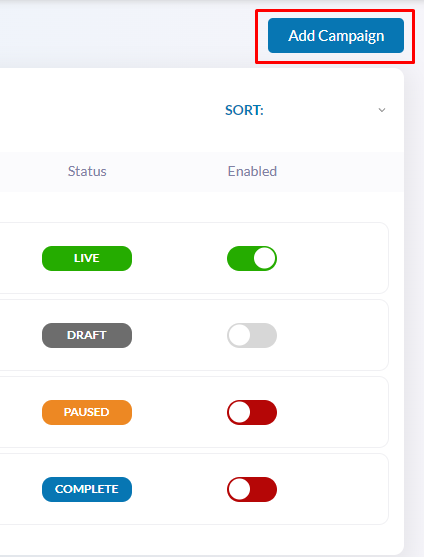
Here, you’ll find details such as:
- The name of each campaign, providing a quick reference to your various initiatives.
- The creation date, helping you track the lifespan of your campaigns.
- Associated contact lists, indicating which contacts are being targeted in each campaign.
- The number of task steps included, offering insight into the complexity and stages of your campaign workflow.
- The profile queue, showing how many profiles are lined up for engagement.
- The campaign status, which can be live, draft, paused, or complete, allowing you to gauge the operation phase of your campaign at a glance.
- Lastly, the near-by enabled toggle, a critical feature that lets you activate or deactivate your campaigns with a simple click, providing you with immediate control over your campaign’s execution.

Setting Up a New Campaign in LinkedSavvy
Creating a new campaign in LinkedSavvy is a straightforward process designed to maximize your networking and outreach efficiency on LinkedIn. This segment will guide you through each step, from naming your campaign to selecting contact lists and determining the daily profile addition limits.
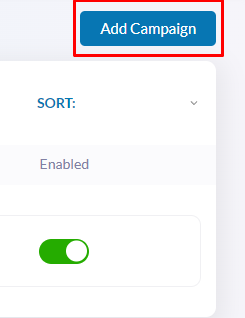
Step 1: Adding a New Campaign
- Navigate to the top right-hand corner and click on “Add Campaign.” This action opens a dialog box where you’ll begin the setup process.
Step 2: Naming Your Campaign
- The first field you’ll encounter is for the campaign name. Choose a name that’s descriptive and meaningful to you. This name will not only help you identify the campaign in your dashboard but will also appear in your daily digest emails and any activity reports you generate. For example, let’s name it “Example Campaign.”
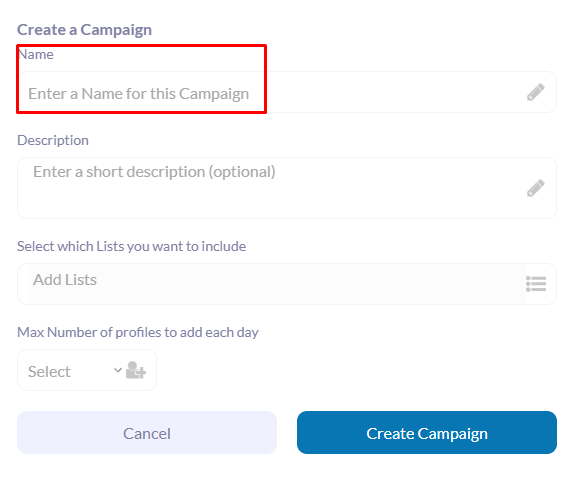
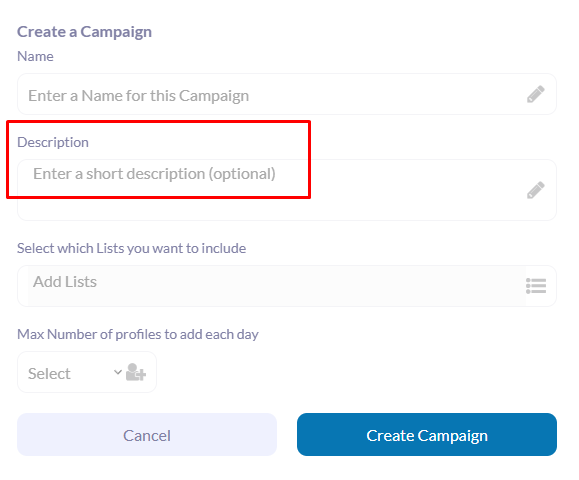
Step 3: Providing a Campaign Description (Optional)
- Though optional, adding a description can be valuable. It helps you remember the campaign’s purpose and can assist in outlining the desired outcome. In future updates, this description will play a crucial role as LinkedSavvy expands its AI functionalities to enhance campaign targeting and effectiveness.
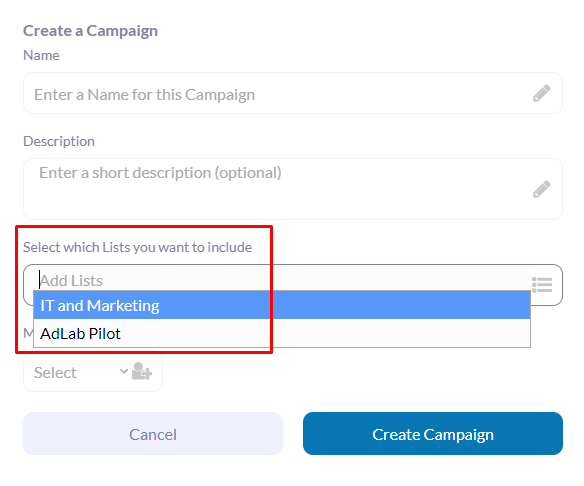
Step 4: Selecting Contact Lists
- Your campaign’s effectiveness hinges on the contact lists you choose as the source for your outreach. At this point, you cannot proceed without selecting at least one contact list. If you haven’t created any contact lists yet, refer to our previous tutorials on setting up and managing contact lists in LinkedSavvy here.
- Choose one or more contact lists that align with the goals of your campaign. For instance, you might select a list titled “First Degree Connections” to target your existing LinkedIn connections.
- You can add several contact lists, LinkedSavvy will work on them in the order that they’re added and will work on one list at a time; when it exhausts, LinkedSavvy will move on to the next list.
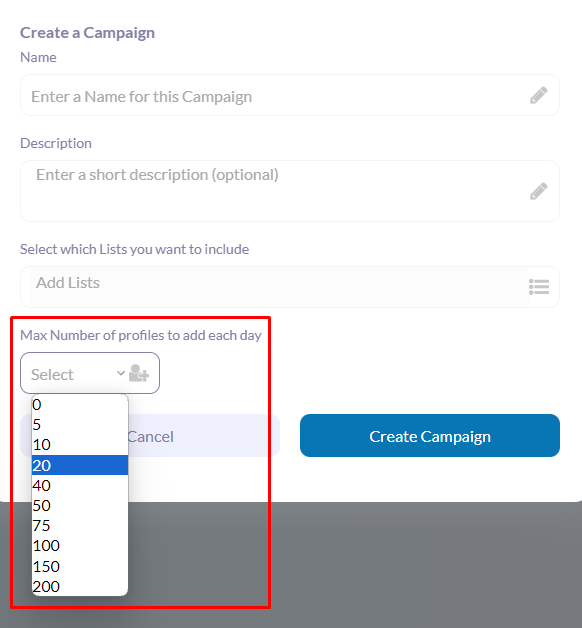
Step 5: Setting Daily Profile Addition Limits
- Next, specify the maximum number of profiles you want to add to your campaign each day. This setting ensures that your campaign’s activity aligns with your overall LinkedIn engagement strategy and remains within acceptable usage limits to avoid triggering LinkedIn’s spam detection mechanisms.
- For example, setting a limit of 20 profiles per day ensures that your campaign runs smoothly, distributing your engagement efforts evenly over time.
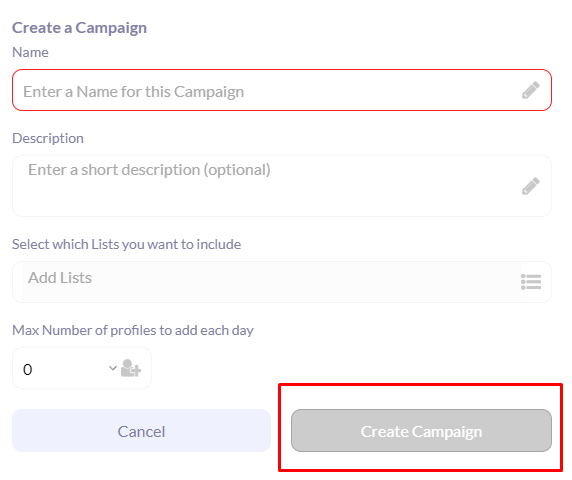
Step 6: Creating the Campaign
- Once you’ve filled in all the details, hit “Create Campaign.” You’ll be greeted with a visual confetti celebration as LinkedSavvy confirms the creation of your new campaign, which will now appear in draft status on your campaign dashboard.
Congratulations! You’ve successfully set up a new campaign in LinkedSavvy. With your campaign now in draft status, you’re ready to dive into the intricacies of managing your campaign, adding tasks, and fine-tuning your outreach strategy.
Understanding Campaign Status and Management in LinkedSavvy
Navigating through the campaign management interface in LinkedSavvy is crucial for executing successful LinkedIn outreach strategies. This segment delves into understanding different campaign statuses, how to effectively manage your campaigns, and the significance of each status for your overall campaign strategy.
Campaign Status Overview:
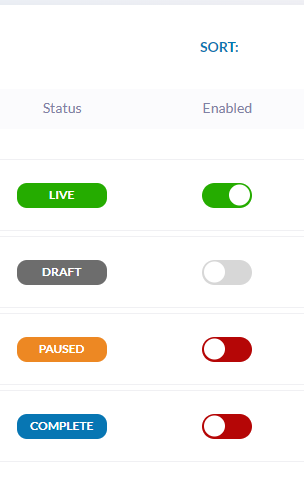
Upon creating a campaign in LinkedSavvy, you will encounter various statuses that indicate the current phase of your campaign:
- Live: Indicates that your campaign is actively running. Tasks within the campaign are being executed as scheduled.
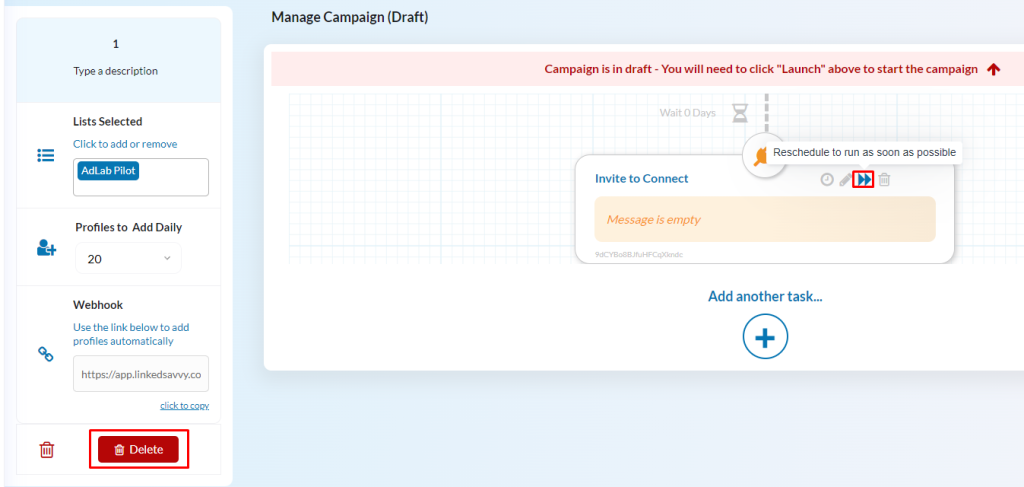
- Draft: Shows that your campaign is created but not yet launched. This is the planning phase where you can add, modify, or remove tasks without affecting your LinkedIn activity.
- Paused: Signifies that the campaign has been temporarily halted. No tasks within the campaign will execute until you resume the campaign, allowing you to make adjustments or pause outreach during specific periods.
- Mark Complete: Marks the completion of the campaign. This status is either manually set or automatically applied when all scheduled tasks have been executed and there are no more profiles to process. This action cannot be undone so please take it at your own caution.
Managing Your Campaigns:
- Enabling and Disabling Campaigns:
- Within the campaign dashboard, you’ll notice a toggle next to each campaign. This toggle allows you to quickly enable or disable a campaign, providing an efficient way to start or pause your outreach efforts without delving into individual campaign settings.
- Adding a New Campaign:
- Click on “Add Campaign” to initiate a new campaign setup. This process involves naming your campaign, providing an optional description, selecting contact lists, and setting daily profile addition limits.
- Editing Campaign Details:
- To edit the name or description of an existing campaign, simply hover over the respective fields to reveal a pencil icon. Clicking on this icon allows you to make necessary adjustments, ensuring your campaign details remain relevant and accurate over time.
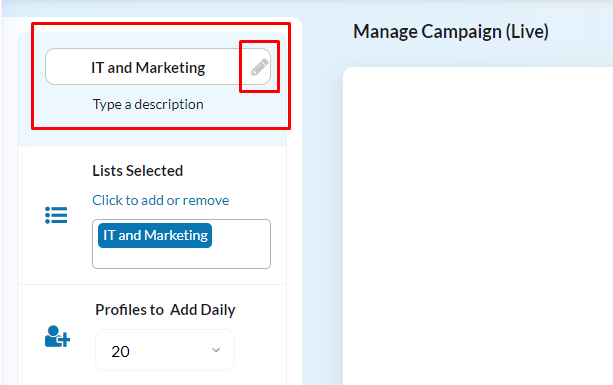
- Adjusting Contact Lists:
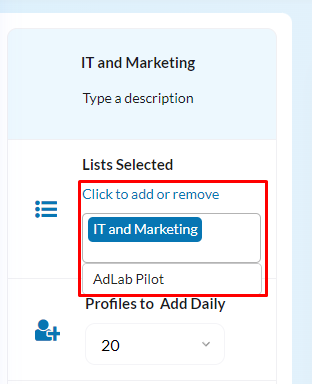
- LinkedSavvy campaigns derive their power from the targeted contact lists you choose. By clicking in the contact list field within the campaign management screen, you can add or remove contact lists based on your evolving outreach strategy. Note that each campaign requires at least one contact list to function, and if you wish to remove a contact list, you must first add an alternative.
- You can add several contact lists, LinkedSavvy will work on them in the order that they’re added and will work on one list at a time; when it exhausts, LinkedSavvy will move on to the next list.
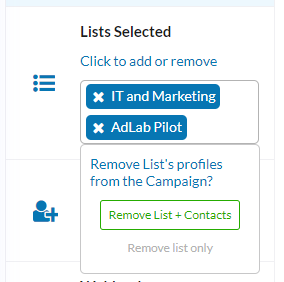
- Removing Lists and Contacts:
- When removing a contact list, you’ll be prompted to choose whether to remove just the list or both the list and its contacts from the campaign. This flexibility allows you to refine your target audience or rectify any list selection errors without restarting your campaign from scratch.
- Remove List + Contacts: This option will clear out the queue of contacts in every task of the campaign. Use it if you want to change the target completely and stop engaging with the contacts that were assigned in the campaign already.
- Remove list only: If the contact list you want to remove from the campaign is a list that refreshes periodically, this option will just stop adding leads from that list into the campaign after it is refreshed, but it will NOT remove the existing queue of contacts, and the contacts in queue will still be engaged by the according step of the campaign they’re on.
- When removing a contact list, you’ll be prompted to choose whether to remove just the list or both the list and its contacts from the campaign. This flexibility allows you to refine your target audience or rectify any list selection errors without restarting your campaign from scratch.
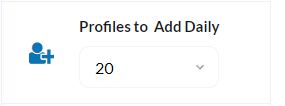
- Daily Profile Additions:
- The “Profiles to Add Daily” setting is pivotal for managing the flow of profiles through your campaign. It determines how many new profiles are introduced to your campaign each day, ensuring a steady and manageable outreach pace.
Configuring Campaign Tasks in LinkedSavvy
In LinkedSavvy, campaigns are composed of tasks that define the sequence of actions to be taken with your LinkedIn connections or leads. Understanding how to configure these tasks is key to executing effective outreach strategies. This section provides an overview of available tasks and guides you through setting them up within your campaign workflow.
Exploring Available Tasks:
Upon creating a new campaign and navigating to the manage campaign screen, you’re ready to add tasks. Tasks in LinkedSavvy include:
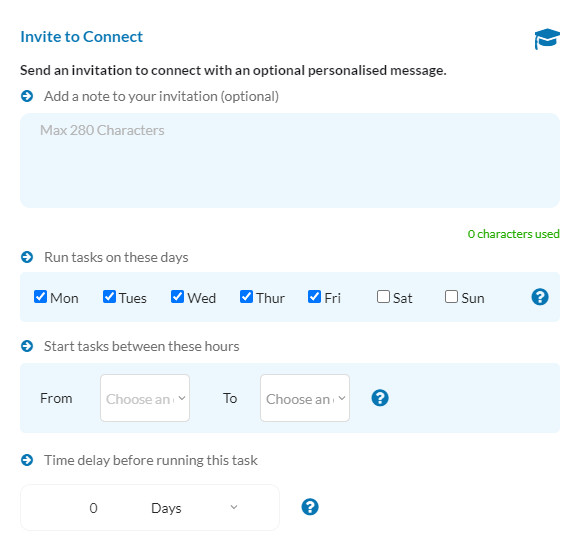
- Invite to Connect: Initiates connection requests to targeted profiles, optionally including a personalized note. If you’re using Standard LinkedIn, this invite note should not surpass the 175 characters in order to be able to add %tokens%. Spintax messages aren’t adviced for this task. If you have LinkedIn Premium or Sales Navigator, the invite note should not surpass 275 character including %tokens%.
- Send Welcome DM: After the contacts accept your connection request, the next step is to send an introductory message to continue the conversation. This is the right task to set up for that matter.
- Send Message (DM or InMail): Delivers direct messages to your connections, allowing for personalization and engagement.
- Endorse Skills: Automatically endorses skills of your connections, fostering goodwill and potentially encouraging reciprocation.
- Like Recent Post: Engages with your connections by liking their recent posts, showing interest in their professional activities.
- Follow Profile: Increases your engagement by following profiles, keeping you updated with their LinkedIn activities.
- View Profile: Visits profiles of potential leads or connections, subtly indicating your interest.
- Message Group Members: Targets members of a specific LinkedIn group with messages, extending your reach beyond direct connections.
- Invite to Event: Sends invitations to your connections for LinkedIn events you’re hosting, enhancing event visibility and attendance.
Setting Up Tasks:
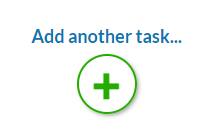
- Adding Tasks:
- Click on the “Add Task” button within the campaign management screen. A list of task types will appear, from which you can select the appropriate action you wish to add to your campaign.
- Customizing Task Details:
- Each task type has specific settings that need to be configured. For example, when adding an “Invite to Connect” task, you can specify a personalized note to accompany the connection request. For message-related tasks, you’ll input the message content, utilizing personalization tokens to tailor your outreach.
- Scheduling and Limits:
- Configure the scheduling settings for each task, including which days of the week the task should run and any specific time frames if applicable. This ensures that your campaign actions align with your overall LinkedIn engagement strategy and adhere to best practices for outreach frequency.
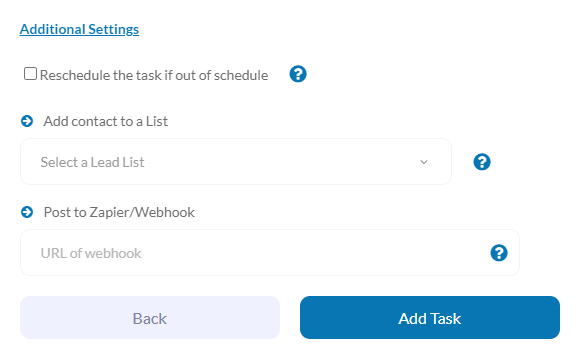
- Utilizing Advanced Features:
- Some tasks offer advanced settings, such as using webhooks for direct profile addition to campaigns or setting a delay before a task runs. These features allow for more precise control over the campaign flow and can be particularly useful for follow-up sequences or integrating campaign actions with external tools.
- Reviewing and Launching Tasks:
- Once you’ve added and configured your tasks, review the campaign workflow to ensure it aligns with your objectives. Make any necessary adjustments, then launch the campaign. The tasks will execute according to the schedule and parameters you’ve set.

Managing Tasks Within the Campaign:
- Editing Tasks: If you need to modify a task’s details or scheduling after it has been added, you can do so by clicking the edit icon next to the task within the campaign management screen.
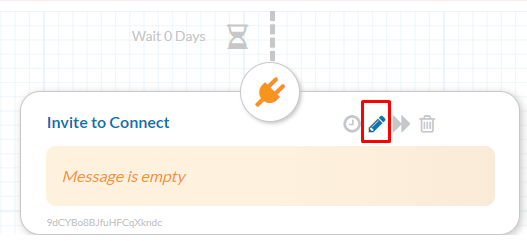
- Rescheduling and Deleting Tasks: LinkedSavvy allows you to reschedule tasks to run as soon as possible or remove tasks that are no longer needed in your campaign. Note that deleting a task may impact the flow of profiles through the campaign, depending on its position in the task sequence.
Managing Data Flow Within a Campaign in LinkedSavvy
Efficiently managing the flow of data within your LinkedSavvy campaigns is crucial for maintaining a steady stream of engagement without overwhelming your leads or your schedule. This section covers how to adjust daily profile additions and ensure your campaign remains productive and aligned with your outreach goals.
Understanding Daily Profile Additions:
- The “Maximum Number of Profiles to Add Each Day” setting is a pivotal control mechanism. It determines the volume of profiles introduced into the campaign daily, balancing outreach efforts and maintaining LinkedIn’s best practices.
- Setting this limit thoughtfully ensures your campaign operates within LinkedIn’s activity thresholds, minimizing the risk of account restrictions.
Configuring Daily Profile Additions:
- Initial Configuration:
- When creating or editing a campaign, specify how many profiles you wish to add each day. This number should reflect your campaign’s objective, the size of your target audience, and your capacity to engage with new connections.
- Adjustment Based on Contact List Size:
- Your chosen daily addition rate should align with the size of your contact lists and the rate at which new leads are acquired. For a list with thousands of leads, a higher daily addition rate may be appropriate. Conversely, for smaller, more targeted lists, a lower rate ensures prolonged and focused engagement.
- Balancing Data Flow:
- Regularly review your lead lists’ growth and campaign performance. If you notice a significant change in the rate at which new leads are added to your lists (through auto-refresh or manual additions), adjust the daily profile addition rate accordingly to maintain a consistent flow of engagement.
Advanced Considerations for Data Flow Management:
- Auto-refresh Feature: If you’ve enabled auto-refresh for your contact lists, be mindful of how new data influx affects your campaign. An increase in available leads may warrant an adjustment in your daily profile addition rate to optimize engagement opportunities.
- Campaign Notifications: LinkedSavvy provides notifications to alert you when your campaign is running low on leads. Use these alerts as a cue to review your contact lists and adjust your campaign settings or replenish your lists as needed.
- Scheduling and Task Execution: Remember, the execution of tasks within your campaign is directly influenced by the number of profiles queued. Ensuring a balanced addition of profiles helps maintain a regular cadence of activity, keeping your campaign running smoothly.
- What Happens with Contacts After Last Step is Reached: When contacts reach the last step of a campaign, they will be removed from the queue, which means that if a next step is added after contacts already reached this step, they will not be moved over to the next step and you’ll need to create a new campaign if you need to reach out to them again.
- Resetting the Queue: In order to start the campaign over and reset the queue when you see it’s at zero contacts, mark the campaign complete and re-launch it. Keep in mind this action cannot be undone so please be extra careful when pressing this button.
Practical Tips:
- Monitor and Adjust: Regularly monitor your campaign’s performance and contact list sizes. Be prepared to adjust the daily profile addition rate as your campaign progresses and as you gain more insights into your engagement rates and lead acquisition.
- Strategic Planning: For long-term campaigns, plan your lead list refresh rates and daily addition settings strategically to ensure sustained engagement without exhausting your lead sources prematurely.
Managing the flow of data within your LinkedSavvy campaigns requires a balance between reaching out to enough leads to achieve your goals and not overwhelming your capacity to engage meaningfully. By carefully setting and adjusting your daily profile addition rates, you can optimize your campaign’s effectiveness and ensure a steady stream of engagement with your target audience. Stay tuned for our next tutorial, where we’ll delve into launching, pausing, and stopping campaigns in LinkedSavvy, giving you full control over your outreach efforts.
Launching, Pausing, and Stopping Campaigns in LinkedSavvy
Once you’ve set up your campaign in LinkedSavvy, including configuring tasks and managing data flow, the next steps are to launch, monitor, and, if necessary, pause or stop your campaign. This section guides you through these processes, ensuring you maintain control over your LinkedIn outreach efforts.
Launching Your Campaign:
- Pre-Launch Check: Before launching, ensure all tasks are correctly set up, your lead lists are populated, and your daily profile addition rates are appropriately configured. This preparation ensures a smooth start to your campaign.
- Initiating the Launch: To launch your campaign, navigate to the campaign management screen and click on the “Launch Campaign” button. Launching the campaign shifts its status from ‘Draft’ to ‘Live’, activating the scheduled tasks according to your setup.
- Immediate Effects: Upon launching, LinkedSavvy begins processing the profiles in your lead lists, scheduling them for the tasks you’ve configured. The system automatically calculates and queues profiles based on the daily addition rate you’ve specified. The actual execution may begin in a matter of a couple of hours depending on how large the target contact lists are.
Pausing Your Campaign:
- Why Pause: You may need to pause your campaign for various reasons, such as reevaluating your strategy, making adjustments to tasks, or responding to external factors like holidays or significant LinkedIn updates.
- Pausing Process: To pause a campaign, simply click on the “Pause Campaign” button either from the main campaigns page or within the specific campaign’s management screen. Pausing changes the campaign’s status to ‘Paused’, halting all scheduled tasks temporarily.
Stopping Your Campaign:
- Stopping vs. Pausing: Stopping your campaign is more final than pausing. You might stop a campaign once you consider it has achieved its objectives, you need to make significant changes or it’s no longer relevant to your goals. – this step will also be applied automatically once the final step of the campaign runs out of contacts.
- How to Stop: Within the campaign’s management screen, you have the option to mark a campaign as ‘Complete’, which effectively stops all activity. This action is advisable when you’re certain no further tasks should be executed, and it cannot be undone so please use it with caution.
Managing Campaigns Post-Launch:
- Monitoring Performance: After launching, closely monitor your campaign’s performance. Pay attention to engagement metrics, response rates, and any feedback you receive from your targets. These insights can help you fine-tune ongoing or future campaigns.
- Making Adjustments: Even after a campaign is live, you can still make adjustments. Whether it’s tweaking message content, adjusting task schedules, or altering the daily profile addition rate, LinkedSavvy offers the flexibility to optimize your campaign in response to real-time results.
- Restarting After Pause: If you paused your campaign, review the reasons for the pause and make necessary adjustments. Once ready, you can resume the campaign, picking up where you left off, by clicking on the “Resume Campaign” button.
Summary:
Launching, pausing, and stopping campaigns in LinkedSavvy are crucial capabilities that give you control over your LinkedIn outreach. By carefully managing these aspects, you can ensure that your campaigns are effective, responsive to your needs, and aligned with your overall LinkedIn strategy. Stay tuned for further tutorials that will delve into more advanced features and strategies to maximize your success with LinkedSavvy.